

前段时间自己做的应用为了提高用户活跃度,打算集成推送功能,试用了下极光推送,这里对集成过程做个总结。
运行官方demo
官方文档:http://docs.jiguang.cn/jpush/client/Android/android_3m/
2016.12.28下载下来的Demo可以直接导入Eclipse,也可以通过File--New--Import Module的方式导入Android Studio。
- 运行demo
导入之后Manifest文件是酱紫的
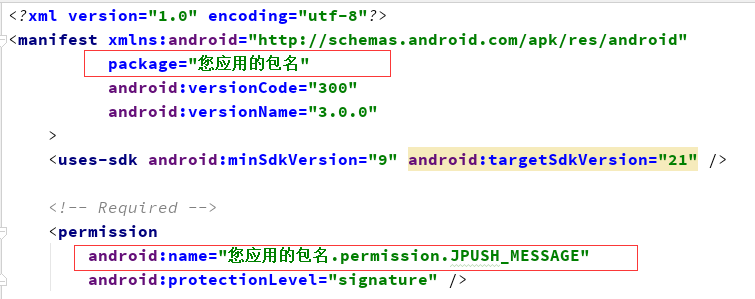
这里应该把“您应用的包名”改成官方Demo的包名,再用这个包名在极光推送后台管理创建应用,获取AppKey然后填入下面的位置(这部分官方文档并没有说明,新手可能会不知道怎么弄)

- 发送通知
有的手机不能显示通知,可以先查看Logcat是否有log输出,如果有,再检查手机设置里面是否允许通知。官方FAQ里面提到了这一点。(另外奇酷手机默认是不允许通知的,开启允许通知后才能显示出来,)
#集成到自己项目里
集成也很简单,按照官方文档一步一步集成就行了。
我用了jcenter自动集成,sdk版本是3.0.0。
1. 在项目根目录配置jcenter
buildscript {
    repositories {
        jcenter()
    }
    ......
}

allprojects {
    repositories {
        jcenter()
    }
}
在module的gradle配置
android {
    ......
    defaultConfig {
        applicationId "com.xxx.xxx" //JPush上注册的包名.
        ......

        ndk {
            //选择要添加的对应cpu类型的.so库。
            abiFilters 'armeabi', 'armeabi-v7a', 'armeabi-v8a'
            // 还可以添加 'x86', 'x86_64', 'mips', 'mips64'
        }

        manifestPlaceholders = [
            JPUSH_PKGNAME : applicationId,
            JPUSH_APPKEY : "你的appkey", //JPush上注册的包名对应的appkey.
            JPUSH_CHANNEL : "developer-default", //暂时填写默认值即可.
        ]
        ......
    }
    ......
}

dependencies {
    ......
    compile 'cn.jiguang.sdk:jpush:3.0.0'  // 此处以JPush 3.0.0 版本为例。
    compile 'cn.jiguang.sdk:jcore:1.0.0'  // 此处以JCore 1.0.0 版本为例。
    ......
}
刚开始出现了这个错误
是因为自己粗心,把ndk那段代码放到 defaultConfig 外面了,把它们放到 defaultConfig 里面就行了。
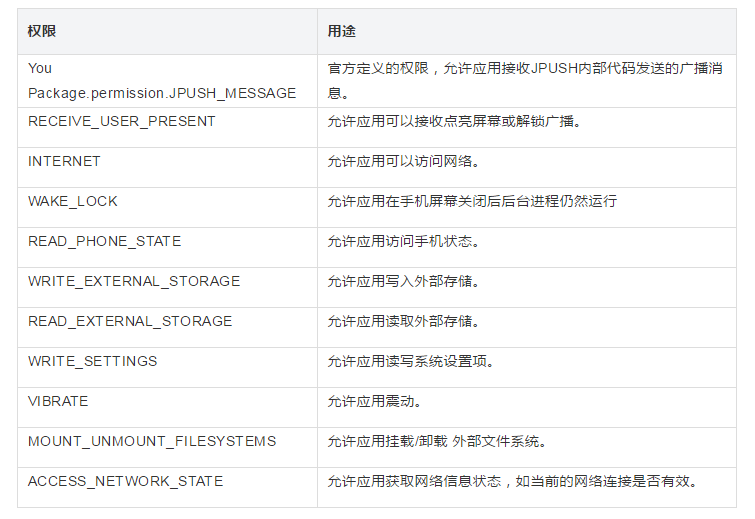
##2. 在Manifest添加必须的权限
##3. 初始化
我是在Application onCreate做的初始化
   JPushInterface.setDebugMode(true);     // 设置开启日志,发布时请关闭日志
   JPushInterface.init(this);             // 初始化 JPush
这样就集成好了,在极光推送后台发送通知,就可以在通知栏显示了。
##4. 设置别名和标签
当需要对特定用户发送通知的时候,可以用别名或标签表示特定用户所属的群组。比如student、teacher。
在Application的onCreate中设置别名和标签,用handler处理,防止阻塞UI线程。
这里的例子分别对别名和标签进行设置,对极光推送官方Demo的代码做了下简化。
public class DemoApplication extends Application {
    private static final String TAG = "DemoApplication";
    private static final String JPUSH_ALIAS = "user";
    private static final String JPUSH_TAGS = "teacher";
    private static final int MSG_SET_ALIAS = 1001;
    private static final int MSG_SET_TAGS = 1002;

    @Override
    public void onCreate() {
        Log.d(TAG, "[ExampleApplication] onCreate");
        super.onCreate();

        JPushInterface.setDebugMode(true);    // 设置开启日志,发布时请关闭日志
        JPushInterface.init(this);            // 初始化 JPush

        Set<String> tagSet = new LinkedHashSet<String>();
        if (PublicFunction.isValidTagAndAlias(JPUSH_TAGS)) {
            tagSet.add(JPUSH_TAGS);
        } else {
            Log.d(TAG, "tag is not valid");
        }
        mHandler.sendMessage(mHandler.obtainMessage(MSG_SET_ALIAS, JPUSH_ALIAS));
        mHandler.sendMessage(mHandler.obtainMessage(MSG_SET_TAGS, tagSet));
    }

    private final TagAliasCallback mCallback = new TagAliasCallback() {

        @Override
        public void gotResult(int code, String alias, Set<String> tags) {
            String logs;
            switch (code) {
                case 0:
                    Log.i(TAG, "Set tag and alias success");
                    break;
                case 6002:
                    Log.i(TAG, "Failed to set alias and tags due to timeout. Try again after 60s.");
                    if (PublicFunction.isConnected(getApplicationContext())) {
                        if (tags != null) {
                            mHandler.sendMessageDelayed(mHandler.obtainMessage(MSG_SET_TAGS, tags), 1000 * 60);
                        } else if (alias != null) {
                            mHandler.sendMessageDelayed(mHandler.obtainMessage(MSG_SET_ALIAS, alias), 1000 * 60);
                        }
                    } else {
                        Log.i(TAG, "No network");
                    }
                    break;
                default:
                    logs = "Failed with errorCode = " + code;
                    Log.e(TAG, logs);
            }
        }
    };

    private final Handler mHandler = new Handler() {
        @Override
        public void handleMessage(android.os.Message msg) {
            super.handleMessage(msg);
            switch (msg.what) {
                case MSG_SET_ALIAS:
                    Log.d(TAG, "Set alias in handler.");
                    JPushInterface.setAlias(getApplicationContext(), (String) msg.obj, mCallback);
                    break;
                case MSG_SET_TAGS:
                    Log.d(TAG, "Set tags in handler.");
                    JPushInterface.setTags(getApplicationContext(), (Set<String>) msg.obj, mCallback);
                    break;
                default:
                    Log.i(TAG, "Unhandled msg - " + msg.what);
            }
        }
    };
}
5. 使用自定义消息
对接收到的消息自己处理,可以有很大的灵活性,并且可以自己定义通知栏样式,方便跟应用其它地方的通知栏样式保持一致。
要推送的消息是json格式,如下所示
{
    "title": "test",
    "message": "this is a mesage"
}
BroadcastReceiver有静态注册和动态注册两种方法,这里用的是静态注册,创建一个名为JPushReceiver的BroadcastReceiver。
Manifest文件
        <receiver
            android:name=".receiver.JPushReceiver"
            android:enabled="true">
            <intent-filter>
                <action android:name="cn.jpush.android.intent.REGISTRATION" />
                <action android:name="cn.jpush.android.intent.MESSAGE_RECEIVED" />
                <action android:name="cn.jpush.android.intent.NOTIFICATION_RECEIVED" />
                <action android:name="cn.jpush.android.intent.NOTIFICATION_OPENED" />
                <category android:name="应用包名" />
            </intent-filter>
        </receiver>
在onReceive里接收传递过来的自定义消息,转换成JSON格式,获取字符串,并显示通知。
完整代码:
public class JPushReceiver extends BroadcastReceiver {
    private static final String TAG = "JPush";

    @Override
    public void onReceive(Context context, Intent intent) {
        Bundle bundle = intent.getExtras();
        if (JPushInterface.ACTION_MESSAGE_RECEIVED.equals(intent.getAction())) {
            Log.d(TAG, "[MyReceiver] 接收到推送下来的自定义消息: " + bundle.getString(JPushInterface.EXTRA_MESSAGE));
            String extraMessage = bundle.getString(JPushInterface.EXTRA_MESSAGE);
            try {
                JSONObject jsonObject = new JSONObject(extraMessage);
                String title = jsonObject.getString(MainActivity.KEY_TITLE);
                String message = jsonObject.getString(MainActivity.KEY_MESSAGE);

                NotificationCompat.Builder mBuilder = new NotificationCompat.Builder(context);
                NotificationManager mNotificationManager = (NotificationManager) context.getSystemService(NOTIFICATION_SERVICE);

                //点击
                Intent resultIntent = new Intent(context, MainActivity.class);
                TaskStackBuilder stackBuilder = TaskStackBuilder.create(context);
                stackBuilder.addParentStack(MainActivity.class);
                stackBuilder.addNextIntent(resultIntent);
                PendingIntent resultPendingIntent =
                        stackBuilder.getPendingIntent(
                                0,
                                PendingIntent.FLAG_UPDATE_CURRENT
                        );

                mBuilder.setContentTitle(title)
                        .setContentText(message)
                        .setContentIntent(resultPendingIntent)
                        .setWhen(System.currentTimeMillis())
                        .setTicker("正在播放")
                        .setPriority(Notification.PRIORITY_DEFAULT)
                        .setOngoing(true)
                        .setSmallIcon(R.drawable.ic_launcher);
                Notification notify = mBuilder.build();
                notify.flags = Notification.FLAG_ONGOING_EVENT;
                mNotificationManager.notify(0, notify);
            } catch (JSONException e) {
                e.printStackTrace();
            }
        }
    }
}
这样就能使用极光推送来发送自定义消息了。
#最后
总体来说,官方文档很详细,后台管理功能也很清晰,能满足项目需求。目前测试阶段,送达率还不错。感谢极光为我们提供了一个这样的平台,也希望极光越做越好,为开发者提供更好的服务!
2条评论
感谢你的肯定,我们会加倍努力哒
说的好详细,有道理!