

iOS 10 came
在今年 6月14号 苹果开发者大会 WWDC 2016 之后,笔者赶紧就去 apple 的开发者网站下载了最新的 Xcode 8 beta 和 iOS 10 beta,然后在自己的手机上装了 iOS 10 beta ,狠狠地体验了一把。
可以说 iOS 10 无论从界面风格,还是 Framework 都做了很多改动。最直观的感受就是界面的圆角增多了,系统动画更加多样和流畅,系统 App 的功能也变得更丰富了。
而 iOS 10 里的推送功能,也较之前更加强大,
今天我们就来聊聊 iOS 10 里的推送功能。
Notifications before iOS 10
首先我们一起简单回顾下 iOS 10 以前的推送服务。
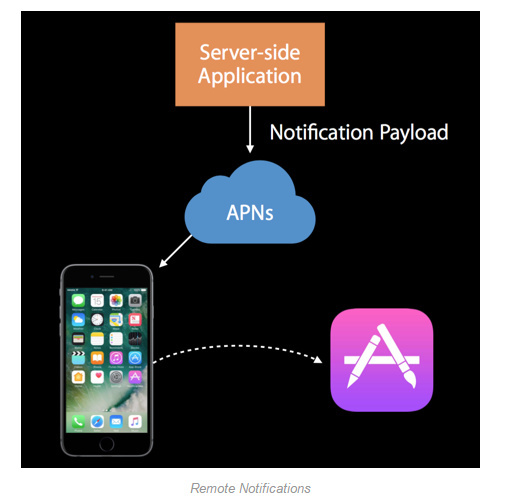
iOS 推送分为 Local Notifications(本地推送) 和 Remote Notifications(远程推送),先看 2 张图: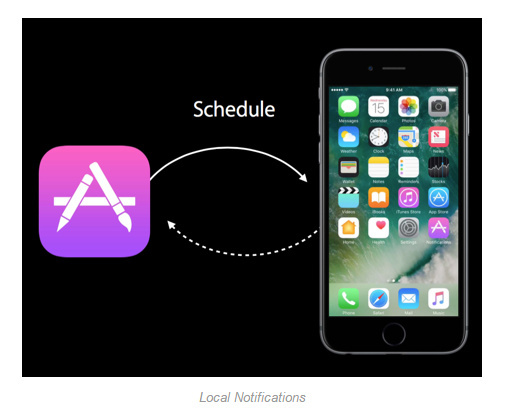
简单的说,就是本地推送通过 App 本地定制,加入到系统的 Schedule 里,然后在指定的时间推送指定文字。
而远程推送通过服务端向苹果推送服务器 Apple Push Notification Service (APNs) 发送 Notification Payload,之后 APNs 再将推送下发到指定设备的 指定 App 上。
以及 iOS 7 之后在不显式地弹窗打扰用户的情况下,进行的静默推送: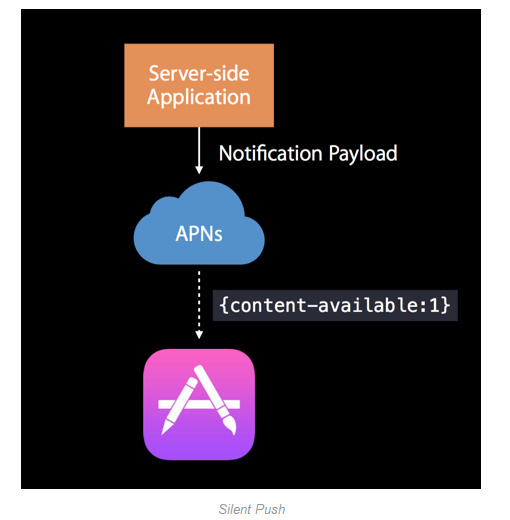
具体做法可以参考 iOS 7 Background Remote Notification
User Notifications Framework
好,扯了这么多,该进入今天的正题了 ——User Notifications Framework 。
首先在AppDelegate.m中
import
#import <UserNotifications/UserNotifications.h>注册推送
以下分别是 iOS 10 之前和之后的注册方式,其中的UNAuthorizationOptions里还可以找到 1 个 UNAuthorizationOptionCarPlay的值是专为车载系统定制的值。
- (BOOL)application:(UIApplication *)application didFinishLaunchingWithOptions:(NSDictionary *)launchOptions {

    //iOS 10 before
    UIUserNotificationSettings *settings = [UIUserNotificationSettings settingsForTypes:UIUserNotificationTypeAlert | UIUserNotificationTypeBadge | UIUserNotificationTypeSound categories:nil];
    [application registerUserNotificationSettings:settings];

    //iOS 10
    UNUserNotificationCenter *center = [UNUserNotificationCenter currentNotificationCenter];
    [center requestAuthorizationWithOptions:(UNAuthorizationOptionBadge | UNAuthorizationOptionSound | UNAuthorizationOptionAlert) completionHandler:^(BOOL granted, NSError * _Nullable error) {
        if (!error) {
            NSLog(@"request authorization succeeded!");
        }
    }];

    return YES;
}
Notification settings
之前注册推送服务,ios 8 及之前使用了不同的 API,并且返回结果也不同。现在 apple 不仅统一了这个 API,而且我们可以获取到用户更加详细的设定了。
[center getNotificationSettingsWithCompletionHandler:^(UNNotificationSettings * _Nonnull settings) {
        NSLog(@"%@",settings);
}];
打印获得如下信息:
<UNNotificationSettings: 0x16567310;
authorizationStatus: Authorized,
notificationCenterSetting: Enabled,
soundSetting: Enabled,
badgeSetting: Enabled,
lockScreenSetting: Enabled,
alertSetting: NotSupported,
carPlaySetting: Enabled,
alertStyle: Banner>
Token Registration
跟之前一样
[[UIApplication sharedApplication] registerForRemoteNotifications];Content
以前只能展示一条文字,现在可以有 title 、subtitle 以及 body 了。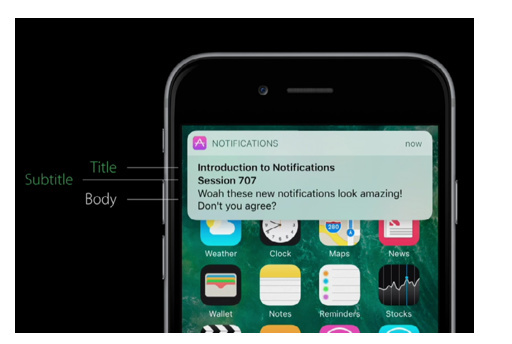
定制方法如下:
//Local Notification
UNMutableNotificationContent *content = [[UNMutableNotificationContent alloc] init];
content.title = @"Introduction to Notifications";
content.subtitle = @"Session 707";
content.body = @"Woah! These new notifications look amazing! Don’t you agree?";
content.badge = @1;

//Remote Notification
{
"aps" : {
    "alert" : {
         "title" : "Introduction to Notifications",
         "subtitle" : "Session 707",
         "body" : "Woah! These new notifications look amazing! Don’t you agree?"
                },
    "badge" : 1
        },
}
Triggers
又是一个新的功能,有三种
- UNTimeIntervalNotificationTrigger
- UNCalendarNotificationTrigger
- UNLocationNotificationTrigger
/2 分钟后提醒
UNTimeIntervalNotificationTrigger *trigger1 = [UNTimeIntervalNotificationTrigger triggerWithTimeInterval:120 repeats:NO];

//每小时重复 1 次喊我喝水
UNTimeIntervalNotificationTrigger *trigger2 = [UNTimeIntervalNotificationTrigger triggerWithTimeInterval:3600 repeats:YES];

//每周一早上 8:00 提醒我给老婆做早饭
NSDateComponents *components = [[NSDateComponents alloc] init];
components.weekday = 2;
components.hour = 8;
UNCalendarNotificationTrigger *trigger3 = [UNCalendarNotificationTrigger triggerWithDateMatchingComponents:components repeats:YES];

//#import <CoreLocation/CoreLocation.h>
//一到麦当劳就喊我下车
CLRegion *region = [[CLRegion alloc] init];
UNLocationNotificationTrigger *trigger4 = [UNLocationNotificationTrigger triggerWithRegion:region repeats:NO];
Add Request
NSString *requestIdentifier = @"sampleRequest";
UNNotificationRequest *request = [UNNotificationRequest requestWithIdentifier:requestIdentifier
                                                                          content:content
                                                                          trigger:trigger1];
[center addNotificationRequest:request withCompletionHandler:^(NSError * _Nullable error) {

}];
推送小结
然后整个推送的过程就变成了酱紫: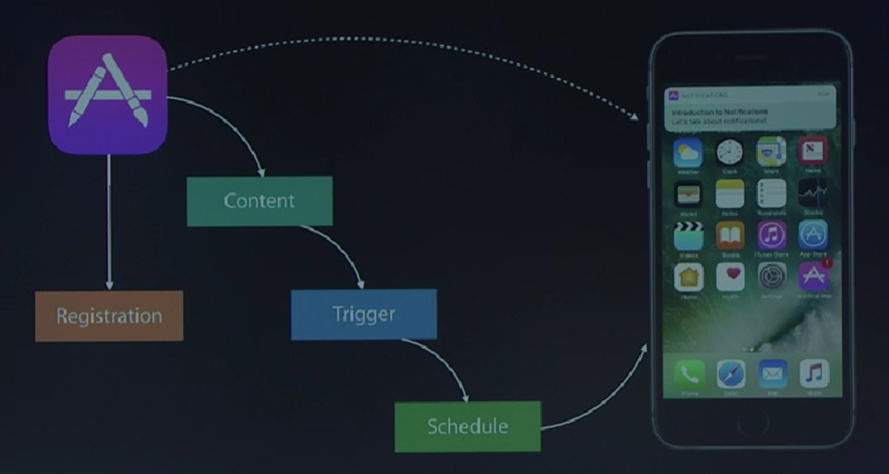
- Local Notifications 通过定义
Content和Trigger向UNUserNotificationCenter进行request这三部曲来实现。 - Remote Notifications 则向
APNs发送Notification Payload。
Notification Handling
设定了推送,然后就结束了?iOS 10 并没有这么简单!
通过实现协议,使 App 处于前台时捕捉并处理即将触发的推送:
@interface AppDelegate () <UNUserNotificationCenterDelegate>

-(void)userNotificationCenter:(UNUserNotificationCenter *)center willPresentNotification:(UNNotification *)notification withCompletionHandler:(void (^)(UNNotificationPresentationOptions))completionHandler{

    completionHandler(UNNotificationPresentationOptionAlert | UNNotificationPresentationOptionSound);

}
让它只显示 alert 和 sound ,而忽略 badge 。
Notification Management
彻底掌控整个推送周期:
- Local Notification 通过更新 request
- Remote Notification 通过新的字段 apns-collapse-id
- 通过之前的 addNotificationRequest: 方法,在 id 不变的情况下重新添加,就可以刷新原有的推送。
NSString *requestIdentifier = @"sampleRequest";
UNNotificationRequest *request = [UNNotificationRequest requestWithIdentifier:requestIdentifier
                                                                    content:newContent
                                                                    trigger:newTrigger1];
[center addNotificationRequest:request withCompletionHandler:^(NSError * _Nullable error) {
}];
```
删除计划的推送:
[center removePendingNotificationRequestsWithIdentifiers:@[requestIdentifier]];此外UNUserNotificationCenter.h中还有诸如删除所有推送、查看已经发出的推送、删除已经发出的推送等等强大的接口。
刷新原有的推送后,在通知中心的显示里,也会有相应的变化,这里注意第 2 条信息,现在比分是 1:0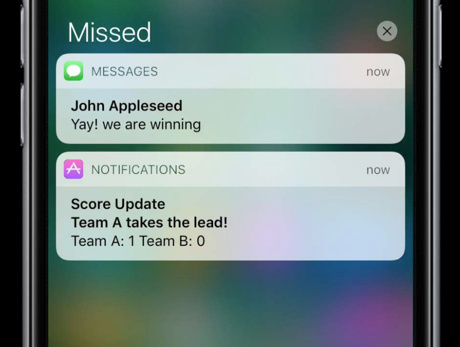
比分刷新后为 1:1,在不产生新的推送条目的情况下位置被前置了!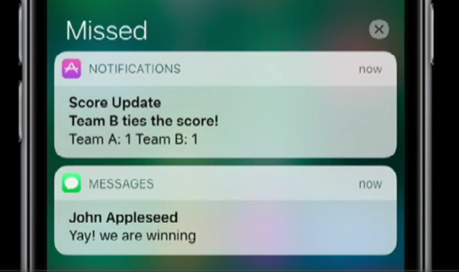
试想利用这个方法,不断的刷新推送,是不是就可以做到让自己 App 的推送内容始终展示在用户手机通知中心的最顶端,力压其余所有内容了呢?总感觉有点不厚道啊~
Advanced Notifications
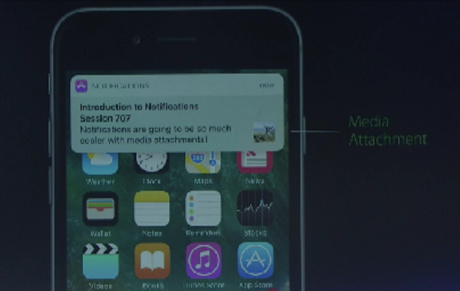
关于推送的更多类似Media Attachments的高级功能,我们将在下一篇里详细讨论。
Media Attachments
为推送添加更多媒体附件,诸如图片、音乐
继续浏览下一篇 玩转 iOS 10 推送 (中)
0条评论